
Scrum was originally made for software developers, but with a little tweaking it can be very useful for product development as well. In this post we will share some practical insights on how we’ve tweaked and implemented Scrum to our hardware processes
Before we get started with the post, you should know, that this is not about how textbook-Scrum works or how it’s implemented – quite the opposite, actually. Instead of re-phrasing all the documentation that out there, we would rather show a few examples on how we’ve modified Scrum for physical inventing.
(If you’re unfamiliar with Scrum, you might want to start out by watching an explainer like this before reading on – to understand the context and terminology).
Ready? Let’s go!
As we explained in our first post about scrum, our main reason for choosing Scrum over Waterfall was the search for a more agile way of developing products. We liked the Scrum framework immediately and started implementing it textbook-style. But.
We quickly realized that not all of the Scrum concepts and tools were useful for us, so we ditched some parts and tweaked others.
Four years later I’m not even sure, we’re allowed to call it Scrum anymore. But let’s call it our version of Scrum in the interest of simplification – a version that’s build on the agile concepts but tweaked for physical inventing instead of software development.
Then we can continue to the part where we tell you about three core-elements that we’ve changed a bit.
1: Ditching product backlog – and our new project breakdown
In the beginning we used product backlog – a prioritized wishlist for the final product – and then broke it down into “sprint backlog” for each sprint. Textbook Scrum – but it proved ineffective. For that reason we started tweaking it, and now our project hierarchy looks more like a mix between traditional, linear development and Scrum:
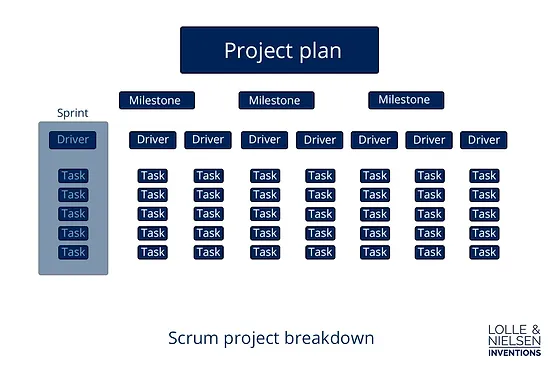
Like traditional waterfall development we start by organizing the project plan and define some milestones (prototypes, design protection, deadlines with partner etc.).
From here the agile framework begins: Every milestone is reached through a series of sprints. We set a driver for each spring (e.g. “Preliminary layout for alpha” or “first mockup”), and define a number of tasks in order to reach that driver (a different terminology, but you might notice the similarity to sprint backlog and tasks here).
In Scrum the idea of each sprint is to finish a potentially shippable product. In our physical world this can mean a finished concept (a shippable concept for potential partners or investors), a mockup (in theory it’s shippable – but it’s far from done), a prototype – etc.
By using these sprints we work in loops instead of linearly. Among other things this means we’ve become way more likely to create mockups early on – which is a big plus, as it improves our ability to implement design changes on an informed basis early on in the process.
2: The agile board – our visual artifact
We are a relatively small team with a lot of active projects. In order to keep track on the progress of each project, we use what we call “the agile board”. It gives us a visual overview over each project: what are the drivers and the task in progress right know, who’s working on the project and how much time is allocated.

The board on the left is what it looks like in the beginning of a sprint – the one to the right is when the sprint is over.
Our sprints are typically four weeks long, and arranged like this (examples from picture):
– Driver: Defines the overall task for this loop? (“Preliminary layout for alpha”)
– Each row represents a task (“new offer on electronics”, “workshop in Hvidovre”, “CAD review”).
– In the column beside the task, the responsibility for each task is given to one of the team members (“AL”, “SN”, “MH”).
– In the next column each magnet (the dots) represents the ressources for the task. Each magnet is half a day for the project – every color represents a member of the team.
– The following columns represents each week of the sprint (“uge 1”, “uge 2”, “uge 3”, “uge 4”).
By using this simple board, every team member always knows what has to be done, and who’s doing what right now.
3: Keep it simple and effective
The main thing for us has been to keep the framework simple, and remember why we are using it: To get a sleek development process.
Resources could be allocated in 1, 2, 4, 8 hours, but instead we have chosen to use half days – always. A “burndown chart” is useful, but the time it took to keep it updated was better spend elsewhere.
The main thing Scrum has helped us do, was change our mindsets from linear to agile. Keep in mind that frameworks and methodology is only words. Forget the textbook and use the parts that makes sense to you.
About the series: In the search of a more agile project management methodology we stole the Scrum design process from software developers and made it our own. By turning our back on the traditional and linear waterfall methods we’ve achieved a more dynamic, cost efficient and successful way of inventing.
In this series we want to explain why we made the change to Scrum – and how we’ve applied it.
This is part 2 of 3. If you don’t want to miss next part, you can sign up for our monthly newsletter.
#scrum #hardwaredevelopment #agileboard #productdevelopment #methodology